
For this tutorial, I will show you how to easily redirect or add your free custom domain from Freenom in your Blogger or Blogspot. If you do not have an account or a free domain from Freenom yet, then, do this tutorial first and go back to this tutorial later.
If you already have a Freenom account and a free domain name, then, proceed to the steps below.
Table of Contents
- Accessing Blogger Settings
- Accessing your Freenom Domain
- Managing your Freenom Domain
- Adding Blogger/Google CNAME and A records in your Freenom Domain
- Saving Freenom inside Blogger's Custom Domain
- Viewing Freenom domain redirected to a Blogger website
Here are the steps on how to link Freenom domain to Blogger
Accessing Blogger Settings
1. Login your Blogger account and go to Settings.

2. Inside Settings, under Publishing, click Custom domain.

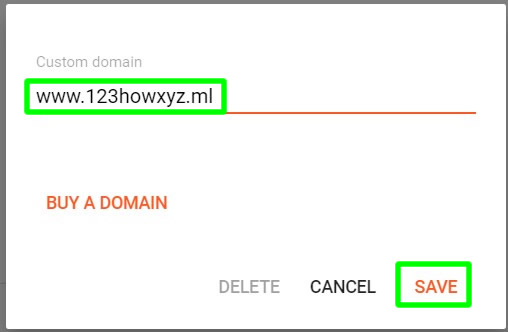
3. Type your Freenom domain name. In my case, I got www.123howxyz.ml. When done, press SAVE to proceed.
4. Under "We have not been able to verify your authority to this domain.", get the 2 CNAMES with its names and destinations.

Accessing your Freenom Domain
1. Now, login your Freenom account and go to Services and then click My Domains.

Managing your Freenom Domain
1. Inside your My Domains, click your Domain's "Manage Domain" .

2. Inside Managing your domain, click on Manage Freenom DNS.

Adding Blogger/Google CNAME and A records in your Freenom Domain
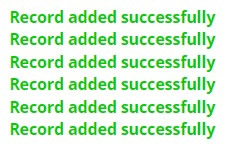
1. Now, add the 2 CNAMES from Blogger. (see pattern below on how to add CNAMES). When done, add 4 A records with the Target values of 216.239.32.21, 216.239.34.21, 216.239.36.21, and 216.239.38.21. (see image below for pattern). Set all TTL's to 3600. When done, press Save Changes button to proceed.

2. CNAME's and A records are now added successfully.
Saving Freenom inside Blogger's Custom Domain
1. Back to your Blogger adding a custom domain, press SAVE.

2. If the error "Could note update settings. Try again" appears, then, you need to wait for about 30 minutes to 2 or more hours before your can save your Freenom domain in your Blogger custom domain. Since this is just a new domain and you edited the nameservers to point to Blogger/Google, it will take some time.

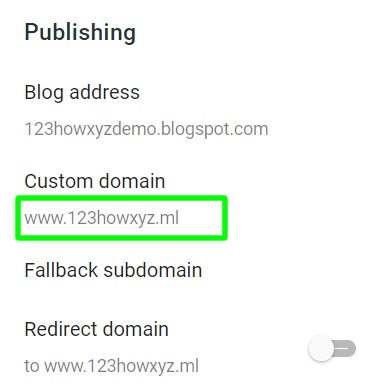
3. Assuming that you have waited long enough, then, press SAVE again. If the custom domain is now saved, you will then see it under Custom domain.
Viewing Freenom domain redirected to a Blogger website
1. To view your website with Freenom domain. Just go to your Freenom domain name. Do not forget to add www in the beginning of your domain for it to work.

Thank you for reading this tutorial guys. If you have a question, just leave a comment below. Cheers!

0 Comments
Please comment according to the post topic. Any links and off-topic comments will not be published. Thanks!