
For this post, I will be showing you how to easily create an Ubuntu live USB using Windows 11. Note: This process is also 100% working in earlier versions of Windows such as Windows 10, 8 and 7 operating systems. I will be using Ubuntu 10.04 (Lucid Lynx) for this tutorial but you can also try other latest older or latest versions if you want to. I have provided links for all the Ubuntu ISO file downloads below for your convenience.
An Ubuntu bootable live USB is very useful specially if you want to copy files from a corrupted external hard drive or USB drive. If your Windows is already unbootable or will not load at all, you can backup your important Windows file by booting through your Ubuntu USB. You do not need to install Ubuntu to be able to perform this. Just boot through it and you are ready to go.
Requirements to make a bootable USB from Windows
- USB pen drive
- Ubuntu iso file [download below]
- Rufus [download here]
Ubuntu ISO file downloads direct links
- Ubuntu 4.10 (Warty Warthog) x86
- Ubuntu 5.04 (Hoary Hedgehog) x86
- Ubuntu 5.10 (Breezy Badger) x86
- Ubuntu 6.06.2 LTS (Dapper Drake) 32-bit | 64-bit
- Ubuntu 6.10 (Edgy Eft) 32-bit | 64-bit
- Ubuntu 7.04 (Feisty Fawn) 32-bit | 64-bit
- Ubuntu 7.10 (Gutsy Gibbon) 32-bit | 64-bit
- Ubuntu 8.04.4 LTS (Hardy Heron) 32-bit | 64-bit
- Ubuntu 8.10 (Intrepid Ibex) 32-bit | 64-bit
- Ubuntu 9.04 (Jaunty Jackalope) 32-bit | 64-bit
- Ubuntu 9.10 (Karmic Koala) 32-bit | 64-bit
- Ubuntu 10.04.4 LTS (Lucid Lynx) 32-bit | 64-bit
- Ubuntu 10.10 (Maverick Meerkat) 32-bit | 64-bit
- Ubuntu 11.04 (Natty Narwhal) 32-bit | 64-bit
- Ubuntu 11.10 (Oneiric Ocelot) 32-bit | 64-bit
- Ubuntu 12.04.5 LTS (Precise Pangolin) 32-bit | 64-bit
- Ubuntu 12.10 (Quantal Quetzal) 32-bit | 64-bit
- Ubuntu 13.04 (Raring Ringtail) 32-bit | 64-bit
- Ubuntu 13.10 (Saucy Salamander) 32-bit | 64-bit
- Ubuntu 14.10 (Utopic Unicorn) 32-bit | 64-bit
- Ubuntu 15.04 (Vivid Vervet) 32-bit | 64-bit
- Ubuntu 15.10 (Wily Werewolf) 32-bit | 64-bit
- Ubuntu 16.10 (Yakkety Yak) 32-bit | 64-bit
- Ubuntu 17.04 (Zesty Zapus) 32-bit | 64-bit
- Ubuntu 17.10 (Artful Aardvark) 32-bit | 64-bit
- Ubuntu 18.10 (Cosmic Cuttlefish) 32-bit | 64-bit
- Ubuntu 19.04 (Disco Dingo) 32-bit | 64-bit
- Ubuntu 19.10 (Eoan Ermine) 32-bit | 64-bit
- Ubuntu 20.10 (Groovy Gorilla) 32-bit | 64-bit
- Ubuntu 21.04 (Hirsute Hippo) 32-bit | 64-bit
- Ubuntu 21.10 (Impish Indri) 32-bit | 64-bit
- Ubuntu 22.04 (Jammy Jellyfish) 32-bit | 64-bit
- Ubuntu 14.04.5 LTS (Trusty Tahr) 32-bit | 64-bit
- Ubuntu 16.04.6 LTS (Xenial Xerus) 32-bit | 64-bit
- Ubuntu 18.04.5 LTS (Bionic Beaver) 32-bit | 64-bit
- Ubuntu 20.04.4 LTS (Focal Fossa) 32-bit | 64-bit
Here are the steps in how to make Ubuntu Bootable USB in Windows 11
1. Plug your USB flash drive in the USB port. If your USB device has files inside it, please make a backup first because your USB will be formatted later.
2. Open Rufus. Click the Select button to import your downloaded Ubuntu ISO file earlier.
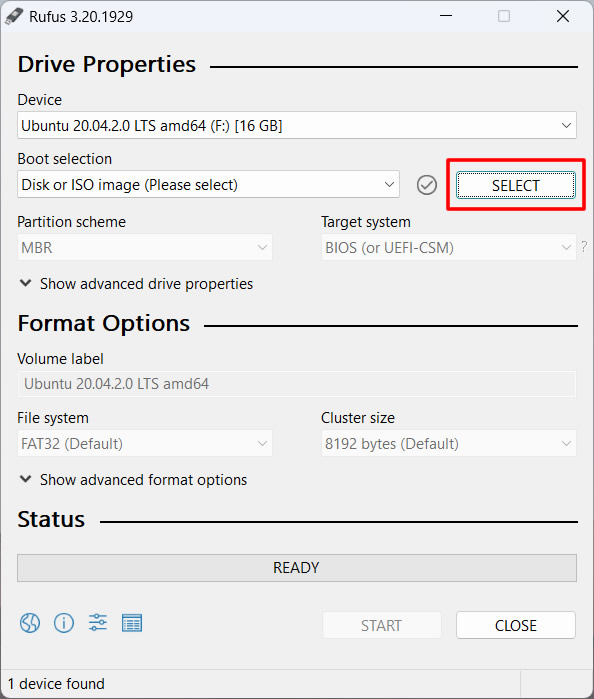
3. Browse for the Ubuntu ISO file and click OPEN button to import your ISO.

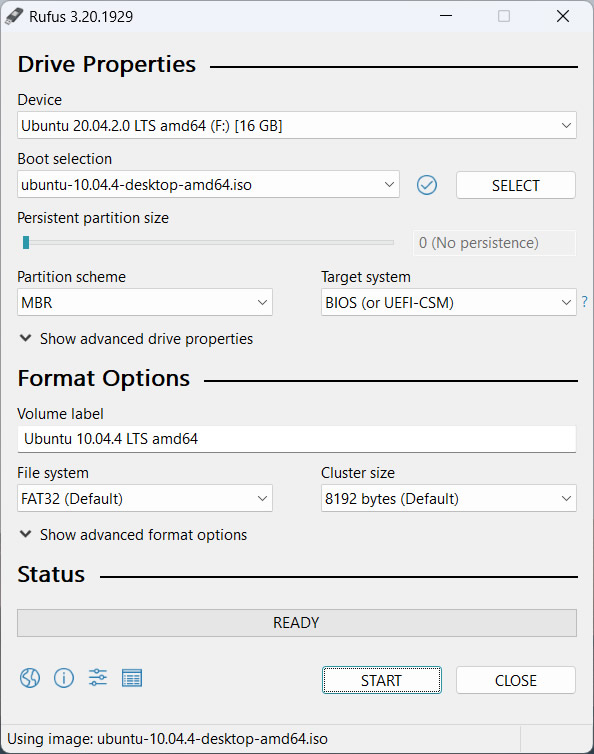
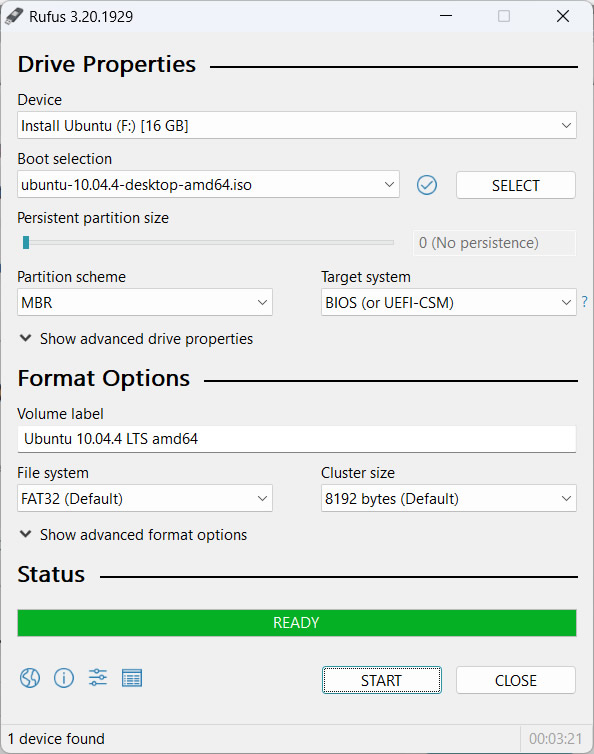
4. Before I forget, as long as there is only one USB drive plugged in your USB port, Rufus will automatically detect it under Device. For the Boot selection, we already selected the Ubuntu-10.04.4-desktop-amd64.iso (for this tutorial). For Partition scheme and Target system, just leave it and do not alter it as well as for the File system and Cluster size. See the Status, if it is Ready, then, click the Start button to start making your Ubuntu bootable USB.
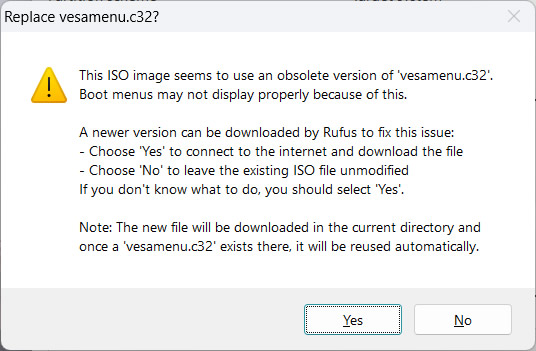
5. If the replace vesamenu.c32 appears, then, just click Yes to confirm.
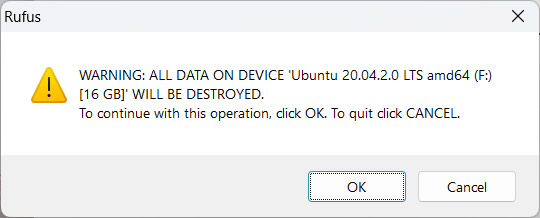
6. For the Warning: All data on device 'Name of your USB device' will be destroyed, click OK to confirm. Just make sure, you already backup your data.
7. The creating of file system just started. Just wait for it for a couple of minutes to finished. The process is automatic, so, just relax for a bit.

8. When done, press the Close button.
9. Restart your laptop or pc. Boot from your Ubuntu bootable USB device. And boom! You have successfully loaded the Ubuntu 10.04 without installing it. You can now access your Windows drive through it and copy important files that you wanted to backup if you cannot access Windows anymore. In latest versions of Ubuntu, you need to click on Try Ubuntu to be able to load it on your pc.

10. Done! You have successfully created your Ubuntu bootable USB using Windows and successfully booted through it.
If you have question, please leave a comment below. Cheers!

0 Comments
Please comment according to the post topic. Any links and off-topic comments will not be published. Thanks!